
Software: SSL, Let’s Encrypt, Certbot, and Nginx.
Eagle-eyed readers may have noticed that the left side of this site’s URL used to display a triangle or the text “Not secure,” but now it’s a cute little padlock. If you copy the URL, you’ll see that the original “http://” has changed to “https://,這代表本站開始使用安全連接層Secure
Socket Layer (SSL).” If a hacker intercepts the network packets between the website server and your computer, they’ll only see encrypted data. Without the encryption keys from both ends, they won’t be able to decipher what the scrambled data actually contains.In fact, as of 2021, most websites already support SSL-secured connections. If you visit a webpage starting with “http://”, your browser might even prompt you to confirm whether you really want to proceed. So, keeping up with the times, I’ve decided to get a little padlock for my site too.
Let me start by saying that SSL certificates can be purchased directly. Many domain providers online offer various plans, with annual fees ranging from $5 to $20, depending on the type of encryption, performance, additional services, and the level of customization. However, one of the challenges of this project is to complete everything without spending a dime—to see just how far we can go using only free resources.
After gathering information over the past few days, I found that the current trend for setting up SSL sites is to use a reverse proxy. There are two popular reverse proxy software options: the first is Nginx, and the other is the up-and-coming Caddy.Although many Reddit users highly recommend Caddy because its installation and configuration are relatively simple, after reading more online articles, many experienced users suggest that NginX actually gives the illusion of being complex due to its powerful features. If you clearly know your objectives,configuring NginX actually takes just a few lines of code. Plus, NginX has a massive community—if you run into a real sticking point and can’t find the answer online, you can simply post on major Q&A sites and easily find experts to guide you. But if you use Caddy, there might not be many people around to help when you hit a snag. Furthermore, NginX has already been used by many large companies to optimize over five million websites worldwide.
After going through some online tutorials, I noticed they usually use Nginx to set up a reverse proxy server, positioned between the original web server and external users. Then, they use the handy tool Certbot to obtain an encryption key bound to our website from the certificate authority Let’s Encrypt,and then use the acquired key to enable SSL on this reverse proxy server. However, my requirements are slightly different: I want to cram everything onto my Raspberry Pi server. I only have one physical server, and all software services communicate with each other via different ports on the same machine and over the local area network. So, without realizing it, I gradually found myself falling into a pit.The installation guide below has been thoroughly tested and debugged; I’ve only highlighted a few specific pain points, so feel free to follow along.
First, of course, SSH into the Raspberry Pi, then enter:
$ sudo apt install certbot
$ certbot certonly --standalone -d <the no-ip address for your site>
(Note: Do not include “http://” in<the no-ip address for your site>
). Certbot will ask a few questions, but you can simply press Enter to accept the default options for all of them—even the default path for storing the two key files at the end is fine.It will store the encryption keys and related files in ``/etc/letsencrypt/live/
`. By default, Certbot uses port 80 on the Raspberry Pi to connect to the outside world, so you must open port 80 on both your firewall and router to successfully obtain the keys.
Once you have the keys, proceed to run `
$ sudo apt install nginx
` to install Nginx. Before configuring it, you need to log into your router’s port forwarding page and change the original WAN 80 to LAN 1313 setting (which was configured for the Hugo server) to WAN 80 to LAN 80, setting both the internal and external ends to port 80.This is to place the reverse proxy server in the middle of the original connection, intercepting incoming requests from the external network on port 80 destined for the internal network. Then, add another rule: forward WAN port 443 to the Raspberry Pi’s address
on LAN port 443. Both of these ports will be intercepted by NginX.At the same time, we also need to open ports 80 and 443 on the Raspberry Pi. Once these two steps are complete, we can begin configuring Nginx.
$ sudo vi /etc/nginx/nginx.conf
Paste the following lines at the very end of the ``http {…}`
` block.
server {
    listen 80;
    server_name <the no-ip address for your site>;
    return 301 https://<the no-ip address for your site>$request_uri;
}

server {
    listen 443 ssl;
    server_name <the no-ip address for your site>;

    ssl_certificate /etc/letsencrypt/live/<the no-ip address for your site>/fullchain.pem;
    ssl_certificate_key /etc/letsencrypt/live/<the no-ip address for your site>/privkey.pem;

    local / {
        proxy_pass http://<the designated LAN ip>:1313;
    }
}
These lines of code are divided into two server blocks. The reason for the two different approaches is that the request sources are different, the processing within the Nginx server is different, and the nature of the destinations is different. A brief explanation follows: The first block listens for requests from the external network to access
via port 80, and then converts them into requests for the encrypted URL “https://".This approach is generally referred to as a redirect. As a result, if a user types “http://” into their browser, NginX will prompt the browser to automatically change it to “https://.” NginX will then send the content over a secure connection back to the user’s browser for display.
The second server block is larger. The first two lines are very similar to the previous block, so readers should be able to guess their purpose: NginX listens on port 443 in this block for requests to access our website. The next two lines of SSL-related code tell NginX the path to the certificate, thereby enabling the SSL secure connection. Since port 443 is commonly used for encrypted requests, we listen on port 443 and establish an SSL secure connection here.The final sub-block, ``local/ {…}`
, is concise and straightforward, but it’s one of the hard-won lessons I learned after falling into a pit and struggling to climb out. It’s actually quite simple: in the first server block, we ended with ``return 301 ...
, which specifies where to forward the request after receiving it. Therefore, in the second block, we must also specify where to send the request. In Nginx, this is done by wrapping the Hugo server’s real IP and port in ``local / {...}
`.This approach is called a reverse proxy, and it is the most basic form of reverse proxy without any additional internal network optimizations.
To summarize, this second server block receives requests from the external network accessing
via port 443, and then proxies the actual location of the Hugo server.A proxy acts as an intermediary; both the buyer and seller conduct transactions through this intermediary. In the context of networking, proxies are further categorized into forward proxies and reverse proxies: forward proxies protect users, while reverse proxies protect servers. The direction of the request between the user and the server determines the type of proxy server.Getting back to the point, with this Nginx server now running on the Raspberry Pi, whenever an external request is directed to<the no-ip address for your site>
—that is,server_name
—the Nginx server recognizes that the incoming request is intended for the Hugo server. Later, when data is sent back from the Hugo server after being encrypted via SSL, Nginx forwards it to the external user based on the request source recorded in its default rules.(Note: Nginx must receive an external request to determine where to send the data prepared by the server it is proxying. In the absence of an external request, if the proxied server attempts to actively send data to a URL that Nginx has never seen before, that data will be discarded.)
One more thing to note: the code in these two blocks is already a streamlined version. NginX offers many more commands, optimizations, and import/export operations. To avoid digressing, we won’t go into too much detail here. Interested readers are encouraged to explore more articles on NginX or reverse proxying.
Great! Now, if you open your browser and enter the URL you obtained from No-IP, you’ll notice a small padlock icon on the left side of the address bar—the encrypted connection is successful, right?
Click into any blog post, and I just realized that the comment section I worked so hard to set up in my previous post is gone. Oh no!
|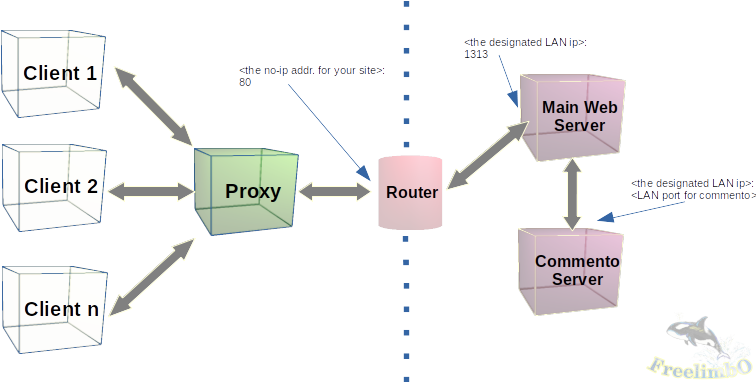
| Original servers’ deployment |
Let’s break down the original connection setup to see where things went wrong. As shown in the diagram above, users originally accessed our Main Web server (HUGO) using the No-IP URL we provided along with the default port 80.with the router forwarding the request to the Raspberry Pi’s internal IP. HUGO then queries the Commento server to retrieve data from the PostgreSQL database. After obtaining the comment data, Commento generates the comment section of the webpage and embeds it at the bottom of the blog page generated by HUGO. The returned URL is the No-IP address registered in Commento via “Add Domain.”(The PostgreSQL server, which does not generate web pages, has been omitted here; in total, only two servers are generating HTML pages for Hugo to serve externally.)
Now that Hugo uses an SSL connection, we’ve introduced an Nginx reverse proxy server into the workflow. This reverse proxy occupies port 80 on the Raspberry Pi, causing Commento to send the rendered page to Nginx, but Hugo never receives the comment section portion of the page, so the comment section doesn’t display. Hmm, this line of reasoning seems plausible.
However, after several hours of careful debugging, I noticed two things: First, the destination address registered in Commento and passed back to Hugo was originally set up using a No-IP address. Even with the reverse proxy in place, while the path from Commento to Hugo is intercepted by Nginx, the request target is a No-IP address. Since this matches the reverse proxy rules defined in the two server blocks mentioned above, it should still reach Hugo.
Second, if a request to view the comments section originating from HUGO reaches Commento, but the source LAN IP address or port of HUGO has changed, Commento will refuse to retrieve the data and immediately return the error message “This domain is not registered with Commento.”, displaying it in the location where the comments section was originally expected to appear. However, after setting up the reverse proxy, this error message did not appear.This implies that the requests sent by HUGO never actually reached Commento. The server proxied by Nginx was confined to a subdomain, and without specific Nginx configuration, the lower-tier HUGO could not access Commento at the upper level because Nginx had not recorded Commento’s address. Consequently, the requests went out but never returned; Commento was never asked to generate the comment section or display an error message.
If you find the terms above a bit difficult to grasp, here’s a good analogy—let me explain it to you: Once upon a time, in Yuyi Village, there was a young man named Yongqiang. His parents had worked hard to raise him, and he was exceptional in both scholarship and martial arts.so Yongqiang discussed it with his parents and decided to leave Yuyi Village to make his fortune in the big city, hoping to achieve something while he was still young. But once he left, he vanished without a trace for ten long years. His elderly parents back home searched high and low but could find no news of Yongqiang. They had no choice but to ask Miss Liu Ying—who had been Yongqiang’s closest friend since childhood—to help find him.
Liu Ying was also of marriageable age. Her parents were a happy couple, but they worried she might not find a suitable match. So the Liu family agreed to the request to search for Yongqiang, allowing Liu Ying to temporarily leave the village to investigate his whereabouts.Liu Ying was a deeply filial daughter. Unlike Yongqiang, who had dreamed of achieving great things and becoming a high-ranking official since childhood, Liu Ying left the village solely to find him and had no intention of lingering. Her only hope was to return home as soon as possible to care for her parents.
So Liu Ying set out, but the world beyond Yuyi Village had undergone several transformations. Not only had street names changed, but the transportation system had been revised time and again. Even if Yongqiang’s residence had remained the same during his ten years away, finding him would still be an incredibly difficult task.And that brings us to the present: there has been no word from Liu Ying to this day. As the saying goes, “If alive, we must see the person; if dead, we must see the body.” If Liu Ying had found Yongqiang, she would certainly have returned to Yuyi Village—she not only knew the way but was constantly longing to go home, so the journey back after completing her mission would not have been a problem. The only possibility, then, is that Liu Ying has still not found Yongqiang.
I hope everyone understands now. The problem lies in the fact that the proxy HUGO cannot find Commento—not that Commento, once found, has no way to return. As for why Yongqiang hasn’t returned to Yuyi Village all these years, that’s another story. To avoid complicating matters further, we’ll save that for next time.
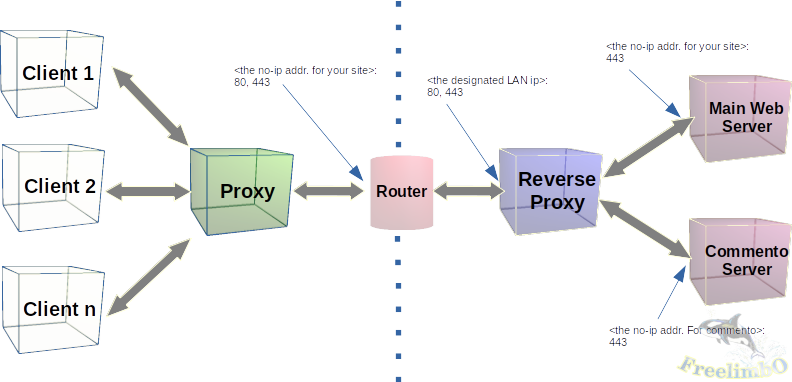
Alright, now that we understand the problem, there are many ways to solve it. Here, I’ll use a relatively simple and direct approach, which I’ll call “If I can’t break out of jail, I’ll drag others into it with me”: what we need to do is use Nginx to proxy Commento as well. If both Commento and HUGO are proxied and both use SSL connections, then they can exchange requests and responses just as they did before(all within Nginx subdomains).
Now, open your browser and register a No-IP address for the Commento server.replace the URL with the alias `` , and use this new URL to obtain an SSL certificate (remember to temporarily stop Nginx to free up port 80, which Certbot needs) at
$ sudo systemctl stop nginx
$ certbot certonly --standalone -d <the no-ip addr. for commento>
. Next, reconfigure Commento: in~/.bashrc
, change the baseURL after COMMENTO_ORIGIN=` ` to https:// , so that Commento communicates with Hugo over an SSL connection.Next, open the Nginx configuration file and create a server block for Commento similar to the two above, placing it within the samehttp {...}
block.
server {
    listen 80;
    server_name <the no-ip addr. for commento>;
    return 301 https://<the no-ip addr. for commento>$request_uri;
}

server {
    listen 443 ssl;
    server_name <the no-ip addr. for commento>;

    ssl_certificate /etc/letsencrypt/live/<the no-ip addr. for commento>/fullchain.pem;
    ssl_certificate_key /etc/letsencrypt/live/<the no-ip addr. for commento>/privkey.pem;

    local / {
        proxy_pass http://<the designated LAN ip>:<LAN port for commento>;
    }
}
After saving and exiting, you must also inform Hugo that when generating the comment section, it should access the new Commento via the new No-IP URL using an SSL-secured connection. To do this, edit the Commento section in the Hugo theme Server address
$ vi ~/<HUGO project>/<the site name>/themes/<your theme name>/layout/_default/single.html
in the Hugo theme, replacing the URL insrc="..."
withhttps://<the no-ip addr. for commento>/js/commento.js
, then save and exit. Next, restart both the Nginx and Commento servers.
$ source ~/.bashrc; ~/<commento project>/build/prod/commento
$ sudo systemctl restart ngix
This completes the new server configuration as shown in the figure below, and your blog site now has both an SSL-secured connection and a comment section.
|
| New servers’ deployment |